Tuesday, September 30, 2014

Eclectic Design: When the Eye Sees Art

What is Eclectic Design?  Eclectic Design is a medley of various styles over various periods of time.  It forms when items are chosen simply because the eye likes them and sees them as art. 

That is definitely true with one of my most recent clients.  They enjoy going to art shows, auctions, consignment stores, and hole in the wall stores.   From these ventures emerge true diamonds they find in the rough. 

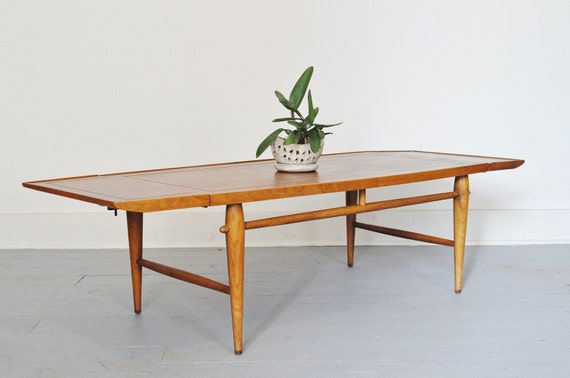
When we first met, it was obvious they knew what they loved by the pieces they already had.  They simply just needed help pulling their look together so that their discoveries worked in harmony and not against each other.  The artwork was what stood out to me the most and became the focal point of the project.  I started out by selecting paint that complimented and set the artwork off. 

Their artwork goes from line drawings of architectural buildings........


to lithographs of villages........


to watercolors of a small town harvest.....


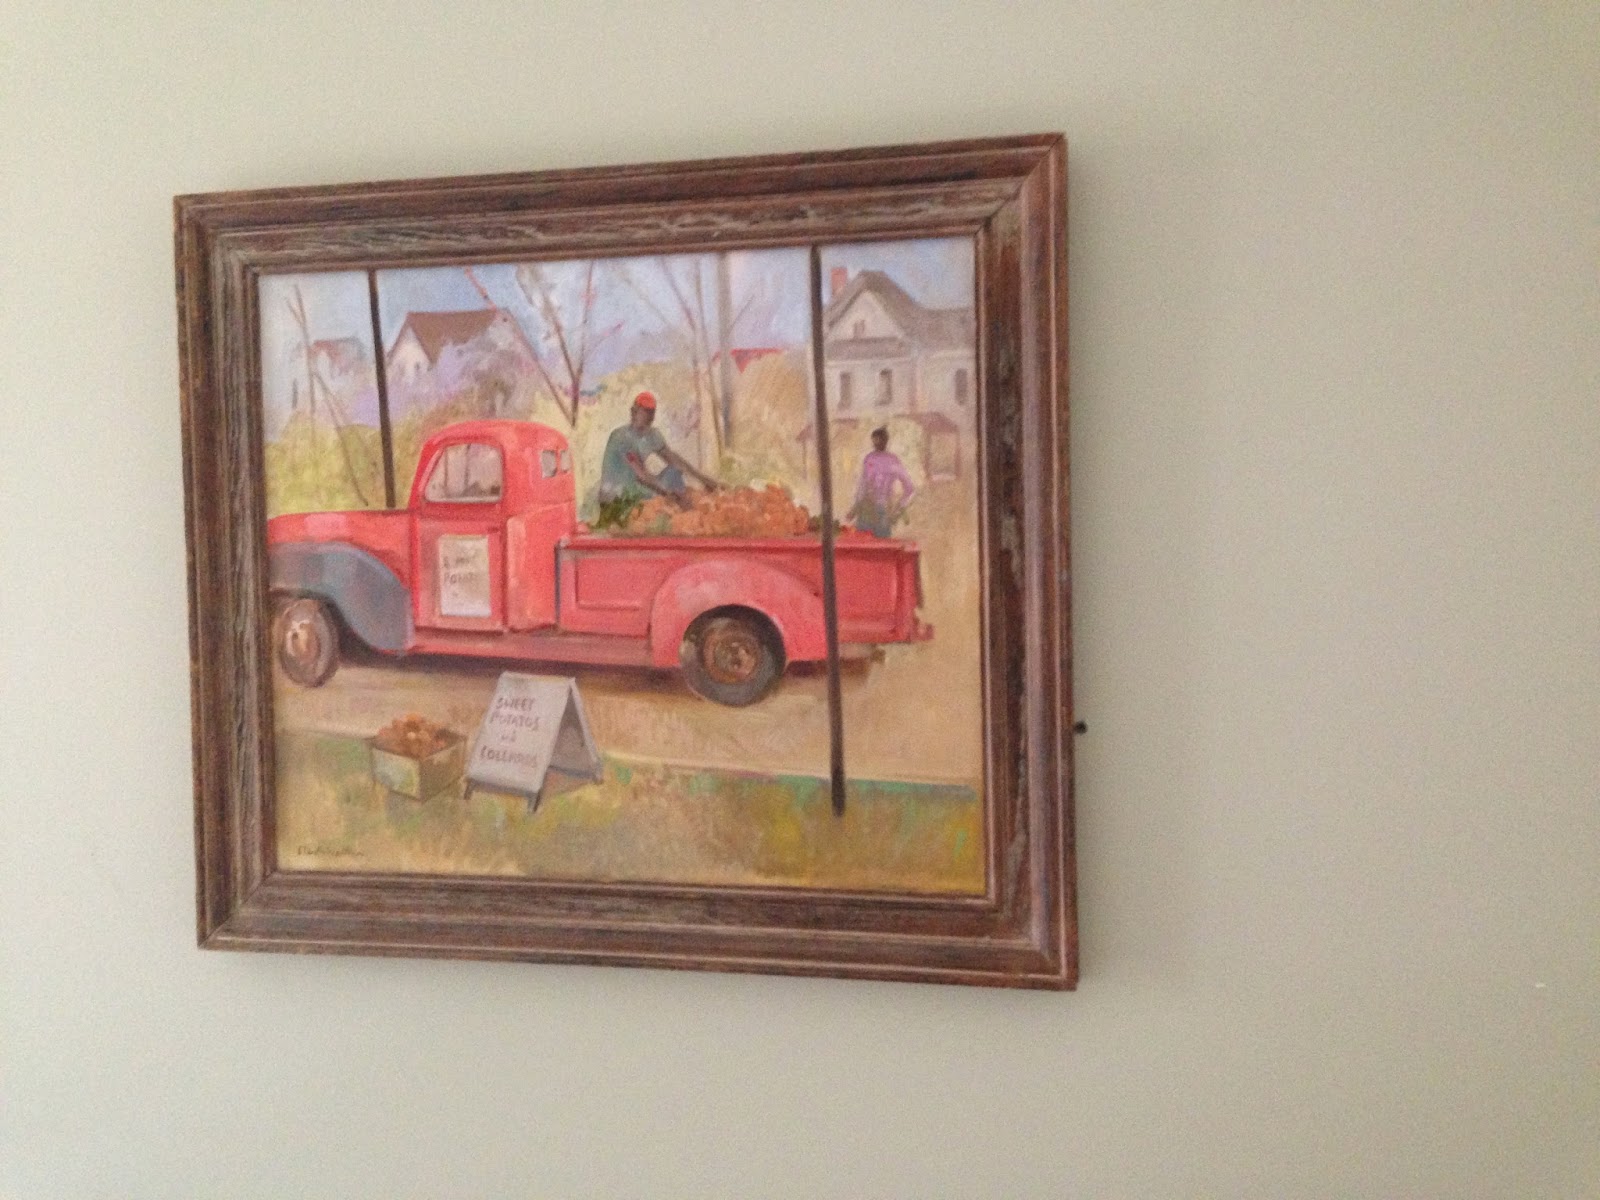
to a watercolor of a barn.....

 
 to live pictures of outer space......


and to an antique print updated with a modern painting of a robot stomping through an ancient city.
 

Oh!  And how could I forget the Alabama Football artwork that boasts a number of Daniel Moore's signed prints?


The paint selection became the backdrop for the artwork.  My client wanted colors that were dark and rich.  Chocolates, grays, navy and fresh green were chosen as backdrops for their collection.  By just painting a house they had purchased, it became a home that showcased their love for art.   After the paintwork was completed, the pictures were grouped and hung so that they would compliment each other as well as furniture and accessories in the room.  It was amazing the transformation that took place!

Until next time, remember that Great Design Takes Time!

Lisa 


Thursday, July 10, 2014

How to Choose a Coffee Table

Like many of you, I remember the days when a coffee table's only purpose was a resting place for drinks, books and television remotes.  They were more about function than design and rather boring. 

Mid-Century Drop Leaf Lane Coffee Table
Source:  https://www.etsy.com/listing/153098932/mid-century-drop-leaf-lane-coffee-table?ref=related-4

There was a period of time that they got big........Trend Spotted: Round Coffee Tables! More living room decorating ideas: http://www.bhg.com/rooms/living-room/family/living-room-decorating-ideas/?socsrc=bhgpin071713roundcoffeetable=13
Source:  http://www.bhg.com/rooms/living-room/family/living-room-decorating-ideas/?socsrc=bhgpin071713roundcoffeetable&page=13&crlt.pid=camp.05v5yewkgToB

and bigger.............................................
huge coffee tables // black velvet chairs
Source:  Pinterest.com


and even BIGGER!!!
a huge coffee table is a fantastic idea. can't tell if this is all one piece, or several that could be moved apart. loving the orange glass pendants too
Source:  http://www.pinterest.com/pin/35677022017931979/


Then there was a period of time we decided they took up too much space and many homes did without them.

Now they are a fashion statement to any room.  We don't just place a coffee table in front of the sofa anymore.  Instead, we use them to anchor our conversational area together.  What should you consider in choosing the right coffee table for your space?

First, let's discuss shape.  There are various shapes of coffee tables now.  For conversation areas that are wide, a rectangular coffee table may be the best fit.  Smaller spaces find circular or square tables to work better. 

Second, you should think about size.  You want to make sure that there is at least 2 feet of walking space around your coffee table.  This helps give you a beginning guideline as to the size of table you need.  Some conversation areas may be rather large and have seating for 10 or more people, while others are small and only seat 3 people. 

Last, we will look at style.  That is what it is all about now!  You will find coffee tables that are fancy, rustic, modern, industrial and from various world influences.  The style is what makes them unique.https://blogger.googleusercontent.com/img/b/R29vZ2xl/AVvXsEiCYCDWyAVT4HVElChhYd9Ox4BE2tfxmSQk6oNSwVDVEZLt6JdXd29fkuBQLhh1h0Dz8k_CPxwWKpPKEmTS8KlTZ8PRcuc2mE68YVjskdJGa9zYhAuvBop1JGfrilMW-ECy8rLBzBMpbh3m/s1600/beach_industrial-baskets-coffee-table-metal-fireplace-0712-dempster12-xl.jpg
When choosing my coffee table, I took all of these factors in consideration.  I first decided on the shape I needed.  For my space, I decided that I wanted a round or square coffee table.  Then I measured my space and that I needed no more than a 30" table.  Lastly, I took a great deal of time deciding what style I wanted and what complimented the existing furniture.  I had seen this one from Restoration Hardware and fallen in love it. 
Wallpaper (“Mayanne”/White #5139): Phillip Jeffries, Coffee tables (“Distressed Ionic Capital Coffee Table”): Restoration Hardware,  Area rug (Calvin Klein Loom Select): Calvin Klein Rugs, calvinkleinrugs.com.  Art over mantel:  arteriorshome.com.  Sconces; chandelier: Circa Lighting,  Tables flanking mantel (“Sutton Criss-Cross Side Table”); head sculpture (The Split); marble urns: Noir,noirfurniturela.com.
Source:  http://www.pinterest.com/pin/235735361718954247/

Just so you know, this one cost around $2K, which is a bit much.  Then, I began seeing another one almost identical to it on the Internet.  I was hesitant to buy it because I hadn't actually seen it.  One day, I went into one of my favorite stores, Greystone Antiques and saw it.  It was priced less than 1/2 of the Restoration Hardware one and it was every bit as beautiful.  I finally decided that it was the look and style I wanted for my living room. 


I love the architectural look of the ionic column.  The hand carving is beautiful.  It has chippie paint and a pine stained top.  It's both elegant yet rustic which is the style I want in my home.  Can you tell the difference in it and the Restoration Hardware one? 
 
 
In case you are interested in purchasing the ionic capital coffee table, I encourage you to visit Greystone Antiques showroom in Birmingham, Alabama.  The last time I checked, they still had one.  Let them know that I sent you. 

Until next time, remember:  Great Design Takes Time! 


Lisa


Thursday, June 12, 2014

Antiquing Cabinets

Cabinetry  can be one of a home's greatest architectural features.  Often homeowners are dissatisfied with the cabinets in their home.  They are either not the right color, outdated or a wood finish that isn't appealing to them.  To replace cabinets is extremely expensive, not to mention the mess it makes.  Believe it or not, to have them painted can be almost as expensive!

One of the reasons, I began using Amy Howard at Home Paint is that you can use it to paint cabinetry with no stripping or sanding!  That takes half the work and mess out of the project. 

Recently, one of my clients was talking to me about a custom butler's pantry cabinet they had in their dining room.  It was painted white.
 

The cabinets were needing refreshing and the client really wanted to do something other than just giving them a fresh coat of white.


We talked about antiquing the cabinets to accent them more.  First, I painted them with Amy Howard's Linen paint. 


Then I used Amy Howard's antique wax and dark wax to give them an antiqued look. 
 

The most beautiful part of the piece was the molding but it was hardly noticed when it was painted white.  Now it stands out because it has depth!


Nothing is more rewarding to me than to stand back and see the difference a change like this can make to a room.  The butler's pantry really makes a statement in this room!


I hope you enjoyed seeing how antiquing cabinets can change a room.  I can't wait to show you later how they look accessorized.

Remember, Great Design Takes Time!


Lisa

Thursday, May 15, 2014

Magnetic Chalkboard: The Story Behind It

In a previous post, I showed you how I had painted an old armoire door that I had.  The story behind the door is that it was a part of a Turn of the Century European collapsible armoire.  Basically, it was held together with pegs that you could remove easily to take the piece down to a base, sides, doors and header to easily transport overseas or across country.  It was not a sturdy piece and my husband had plans to put it together permanently and add more support. 

One day, I was working away at my desk when my then 4 year old daughter came into the room.  I heard a door swing open from the armoire and then the other.  I realized what had was happening as I heard the ancient piece cry out with an, "Eeeeee--errrrrrrrrrrr----CRASH!"  The armoire with its heavy plated mirrored doors came tumbling down, leaving sawdust, splinters, glass and a zillion pieces behind.  Luckily, Adelyn was fine.  She was scared to death that she was in trouble but besides me having a gash on the head, we survived!

I purchased the armoire with money I received for graduation from family so I wanted to re- purpose at least some piece of it.  I had a door without the glass and decided that I wanted to chalk paint it and turn it into a chalkboard.  I made my own chalk paint, painted it, sealed it with wax and then scuffed it up. 


My neighbor, Joann Holloway, creates magnetic chalkboards.  You will find her at shows all over the southeast or you can purchase direct from her website: 

http://www.downmulberrylane.com/categories/Magnetic-Chalk--Boards/


I had always wanted to have one of her works in my home so I took my door down to her to see if she could turn it into a magnetic chalkboard. She did and I as quite pleased with how it turned out. 


I decided to use it in my dining room so that I could write messages, the menu or sayings for our guest to see.  I can also use it to hang with magnets Adelyn's artwork on it if I choose. 


I knew I kept the key to it and found it just the other day.  I think it really finishes off the piece perfectly.  I'm excited to not only have one of her piece of works but also to be able to re-purpose yet again another piece. 

Until next time remember, Great Design Takes Time!


Lisa


Wednesday, April 23, 2014

Exterior Makeover: Adding French Flaire


When we purchased our home in 2008, the exterior was something I wanted to change right away.  Reality set in though, that we had lots of work to do on the inside.  Recently, we were finally able to make the changes that I had dreamed of but beforehand we made a few minor changes that pacified my desires.

This is how our home looked when we first purchased the home in 2008.  The bushes were overgrown and the house was in need of being repainted.  I did not like the red shutters and door at all.  They really clashed with the brick but I knew that new paint would be in the works eventually and I could give it a new look. 
   
There was lots to do to the interior of the house, not to mention it needed a new roof and windows.  We decided to go ahead and do a minor face lift by painting the shutters and trimming the shrubs.  The chocolate paint really warmed up the home.  It's amazing how a little TLC can go a long way!
 
 
 Last year, we were FINALLY ready to paint the exterior.  I chose a medium toned tan for all the trim work.  Then a very dark color for the shutters and doors.  Do you remember how it was when you got your first car and you had to keep going outside to look at it?  Well, we kept having to go outside to look at our house because we loved how it turned out and we had a hard time visualizing the transformation in our heads! 
 
We pulled out the overgrown bushes and replaced them with smaller bushes.  Landscaping is a great way to update a house!
 
Since I wanted to go with more of a European look, I decided to change out the light fixtures on the front of the house.  I liked the look of the old ones but they weren't to scale and because the placement of the sockets were high, I really needed some that dropped down, more like the carriage style.
 
The Man of My Dreams, my husband, Brett, built me some farm shutters which really transformed the look of the house!
 
The antiqued copper faux hinges really finished the shutters off and gave them a unique finish.   
 
In preparing for our exterior makeover, I got a number of quotes around town.  The best quote and the one I had most confidence in was The Painting Company so that is who we used. They really did a great job and were easy to work with.  We have recommended them a number of times since.  If you are interested, let them know that I recommended them! 

I was "pleased as peaches" with the exterior makeover we did.  It's amazing how paint, lighting, and landscaping can transform your home and bring it up to date.  Looking at this home now, would you believe it is 20 years old?  There is not a thing I would change about this project.
Spring is here and I can't wait to add more plants to my flowerbeds.  When I do, I will be sure to share with you!
Remember, Great Design Takes Time!
 
Lisa

Also, a big thanks to Kim, with Savy Southern Style for hosting the linky party this week.  Check her out at:

Friday, April 4, 2014

Guest Bedroom Glimpse: Amy Howard at Home Furniture Makeover

One of my decorating goals for this year is to makeover my guest bedroom.  This is a room that often gets overlooked!  Doesn't it? 

When we moved into our home, we did not have any furniture for our guest bedroom.  Shortly afterwards, my husband's mother offered his grandmother's bedroom suite to us.  This was not a bedroom suite I especially liked but you know me, the wheels started turning and I knew that one day I'd give it a makeover!  I researched various paints to makeover my furniture and chose Amy Howard at Home Paint.  As you see, it was a fairly dated 70's bedroom suite.

 
Here is the mirror that was attached to the dresser.
  

The dresser and chest of drawers had a laminate top, which was a concern in choosing a paint with durable coverage.  I read about Amy Howard at Home paint and found that laminate was one of the materials it does well with covering!  :)
 

  Another perdicament I had was the headboard's lattice had been damaged. 


I began by painting the furniture lightly with 2 coats of Amy Howard at Home One Step Paint in Luxe Grey.  Then brushed on the light wax product, buffed and followed it with the Dust of Ages product by Amy Howard.  I finished it with Amy Howard's Dark Wax.  I loved how the makeover turned out!  


One of the reasons I went with Amy Howard at Home Paint was because I felt that I could capture more of a manufacturer paint finish in the end.  Whatever I chose, I wanted to be sure that it stayed in style for years to come.  The dresser had a mirror but for now I've decided not to use it. I'm hoping to find a more up to date mirror that is more transitional that will breath even more life into the suite. 


I was amazed how the headboard turned out after painting.  It really brought out the curved details and Barley Twist posts.  For the insert I had to get created.  That's my passion!  The lattice really dated the bedroom suite so it was no love lost that I couldn't find any to replace it.  I considered just inserting a solid board or a wood filigree cut out. 


In the end, I decided to go a different route by replacing the lattice with caning. I wet the caning and then stapled it to the back. Then I went over the caning with Amy Howard's Dark Wax to give it more of an antiqued finish.  It turned out looking fabulous!  Don't you think?


There's still lots to do in my guest room makeover.  My next step will be to find draperies and bedding.  Then I will choose a paint color.  I've been looking but nothing has called my name yet.  That's okay because as you know, Great Design Takes Time! 

Lisa


Thursday, March 20, 2014

My Furniture Paint Pick

In our guest bedroom, we have a bedroom suite that was my husband's grandmother's.  I decided that our guest room was in much need of a little tender loving care.  I was not in love with the bedroom suite.  Well, instead of looking at life as full of obstacles, I look for a solution.  I could give the bedroom suite a makeover! 

I began to review various paints on the market to paint the bedroom suite.  I have created my own chalk paint but this was a rather large project so I wanted to use something that was already premixed.  There are a number of lines of paint used to makeover furniture.  I looked at 3 possible solutions. 

Annie Sloan was the first that I looked at.  Annie Sloan is a chalk paint.  It has a smooth finish and comes in wide range of premixed colors.  The color variations are the latest colors out.  According to www.anniesloan.com, "Chalk Paint® is very easy to work with. It very rarely requires any preparation, such as sanding or priming, and can be used indoors or outside, on just about any surface - from wood to metal, and matt plastic to terracotta. It can revitalise old furniture, walls, ceilings and floors with ease. It's easy, fun and makes amazing results accessible to everyone."  I talked with the ladies at Faux Studios in Irondale about the product. Faux Stuidios has a great studio set up and classes starting around $100. A quart of paint cost $35. I love the various colors and finishes Annie Sloan has.  It is a reputable name and I have heard a lot about it.  For more information go to http://www.fauxstudiodesigns.com/.


Miss Mustard Seed Milk Paint was another paint that I looked at.  Miss Mustard Seed is a blogger I have followed for several years.  Her love is painting furniture.  She recently came out with her own line of milk paint.  I have not tried milk paint but it is technique I heard my grandmother refer to.  According to Miss Mustard Seed's site, "Milk Paint is an ancient all-natural paint containing basic ingredients including milk protein (casein), limestone, clay and natural pigments. When absorbed into the surface, Milk Paint will never chip or peel when applied to a raw wood surface. It is suitable for both interior and exterior applications and is naturally mold resistant. Milk paint provides a completely breathable coating and is ideal for painting wood, plaster, drywall and a variety of other surfaces..........With the Milk Paint Bonding Agent you can use Milk Paint on even more surfaces such as previously painted walls, varnished surfaces, ceramic tiles, metal, glass etc. Without the bonding agent, Milk Paint will resist some prefinished or prepainted surfaces to achieve an authentic “chippy” look."  With Miss Mustard Seed paint, you can leave it as is or you may decide to do an antique wax.  You can mix your own paint with her powder but she also has a selection of premixed.  Her paint may be purchased on her site at www.missmustardseedmilkpaint.com/.


The last paint that I considered was Amy Howard at Home paint.  I looked into this paint at Baker Lamps and Linens, off Valleydale Road in Birmingham, Alabama.  The ladies there are fabulous and I have worked with them a number of times on various lamps I have made over in my home.  I had admired a number of pieces that had come through Baker's and had seen some great transformations.  According to Amy Howard's website at www.amyhowardathome.com:  "The Amy Howard At Home One Step Paint is a revolutionary new paint product that allows you to transform furniture, cabinetry and everything in-between with just one swipe of rich, chalky-soft color- yes- it’s that easy. You can even use this on Formica, plastic, metal, and lacquered wood - and yes - it is that good!"  You can paint your piece and leave it as is with a chalky look or you can choose one of their finishes.  There are literally dozens of ways to finish your piece with metallic paint around the edges; dust of ages to give it an aged look; light or dark wax to give it an antique look; and they even have a solution that will antique mirrors!


In the end, I chose the Amy Howard at Home paint.  I was fascinated with all the various techniques I could use.  I felt like I could give my bedroom suite more of an antique look that would last a lifetime!  I loved all the different combinations that I could choose from.  Also, I really enjoy working with the ladies at Baker Lamps and Linens.  They are always so helpful.  Katie talked to me ahead of time about the steps.  She also has classes for those who want that extra help.  Since I have used various paint techniques of my own over the years, all I felt I needed was a little instruction. 


I fell in love with a number of the pieces on Amy Howard at Home's website, like this armoire.  I am seriously thinking of repurposing a television armoire I have that looks like this.  I figure I can use it in my office to store files and my office and media equipment.  Wouldn't you love to have a period looking piece like this in your home? 


Also, Amy Howard at Home paint has been featured in a number of magazines and is used by many designers.  After I used it I saw it referenced in several magazines I had around my home.


Here's a glimpse of the first piece I made over for my guest bedroom.  Isn't it beautiful? 


I now can attest that Amy Howard at Home paint is easy to use and has a wide variety of finishes.  I found it very easy to control which is not always the case when you are mixing your own paint.  My choice is not to say that the others aren't good choices but I really like the various looks you can acquire with Amy Howard at Home.
 
I can't wait to reveal my entire bedroom suite makeover but as you know, "Great Design Takes Time." 
 
Lisa